When I first began fermenting foods many years ago, in a place far, far away, it didn’t take me long to start curing my own bacon. Back then I made a sugar-salt rub for curing, but didn’t smoke the meat. Heck, I didn’t even use curing salt, just kosher salt. While that bacon was good, I decided to up my game recently.
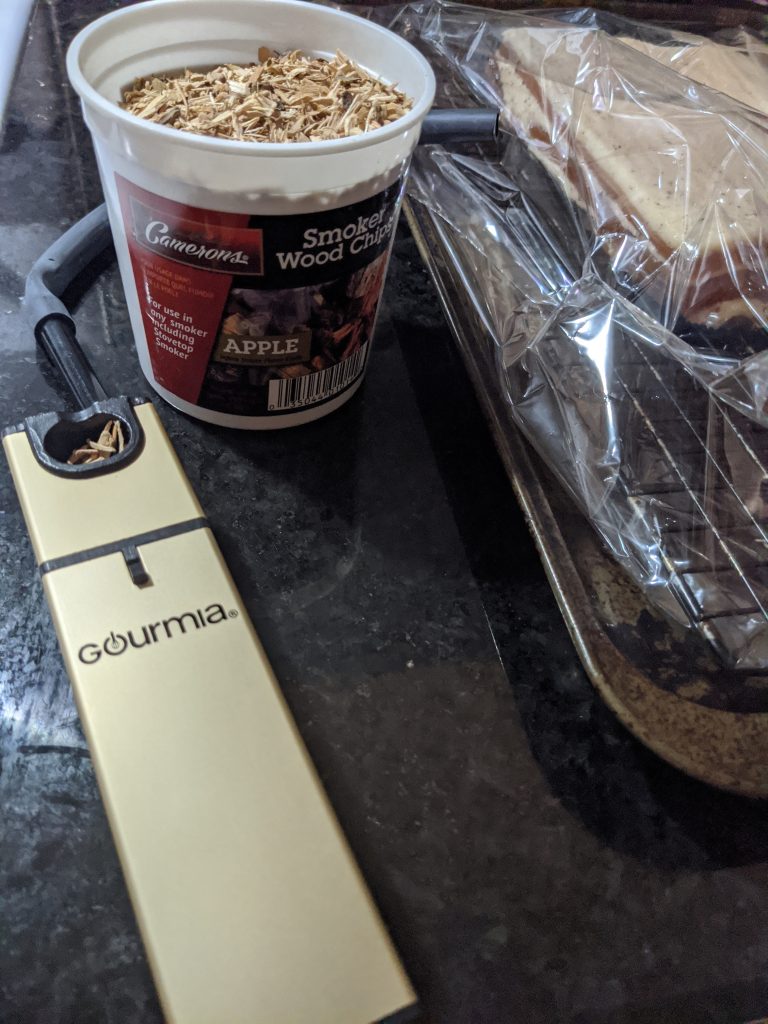
Awhile back I got a smoke gun. I don’t have a grill or smoker at the present moment, but I figured if the fancy chefs on the cooking shows I like to watch use smoke guns with successful results, maybe I could too. I got applewood chips to use in it. Applewood or hickory are usually advised for smoking meat. I also invested in some curing salt. It only takes a small amount, mixed with the kosher salt and sugar to do the job.
A couple of weeks ago I decided to start some fresh bacon. When I made my sugar-salt rub this time around I also added fresh ground pepper and juniper berries. It takes 2-3 weeks for bacon to cure, so today I rinsed it off, let it dry for a while at room temperature and experimented with my smoke gun.
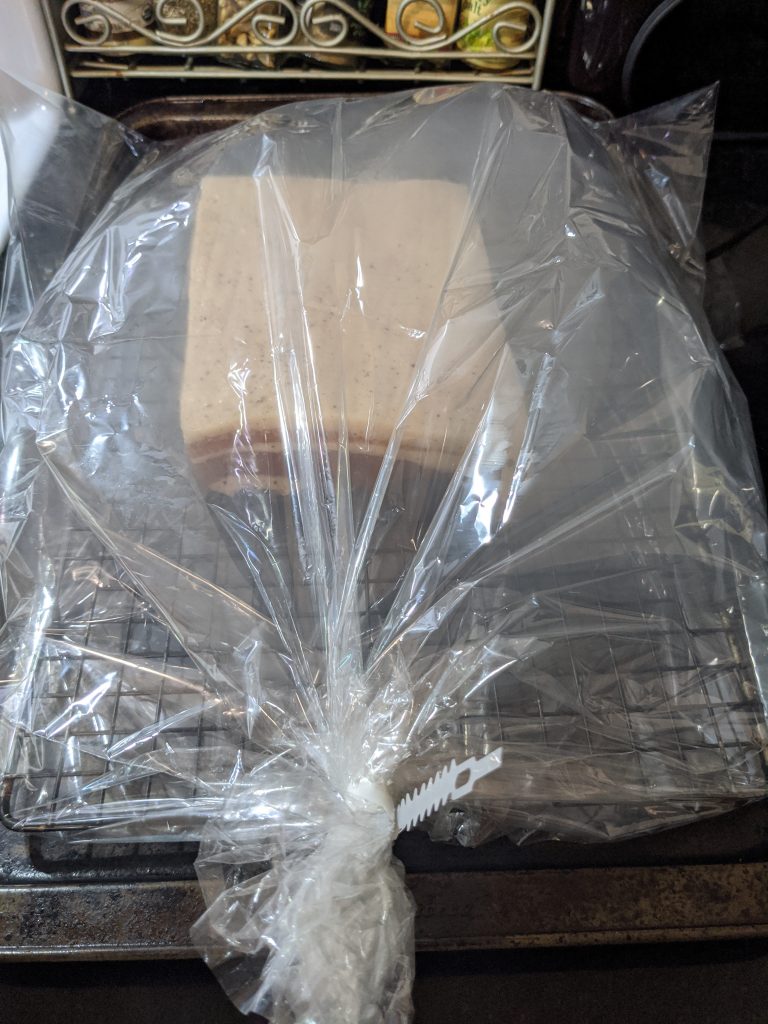
I wanted the smoke to be able to reach all around the meat, so I slid my cured bacon and the baking rack it was resting on into one of those large bags you can cook a turkey in.
Then I filled the bag with smoke. To simulate the experience of a smoker, I put the pan with my bacon in the oven at 200* F. After an hour all the smoke had been absorbed by the bacon. I pulled out the pan, loosened up the opening of the bag and filled it with smoke once again, then let it continue to slowly roast in the oven for another hour. Afterwards, I pulled the bacon out of the oven and out of the bag so that it could cool to room temperature, then popped it back in the fridge to cool down further.
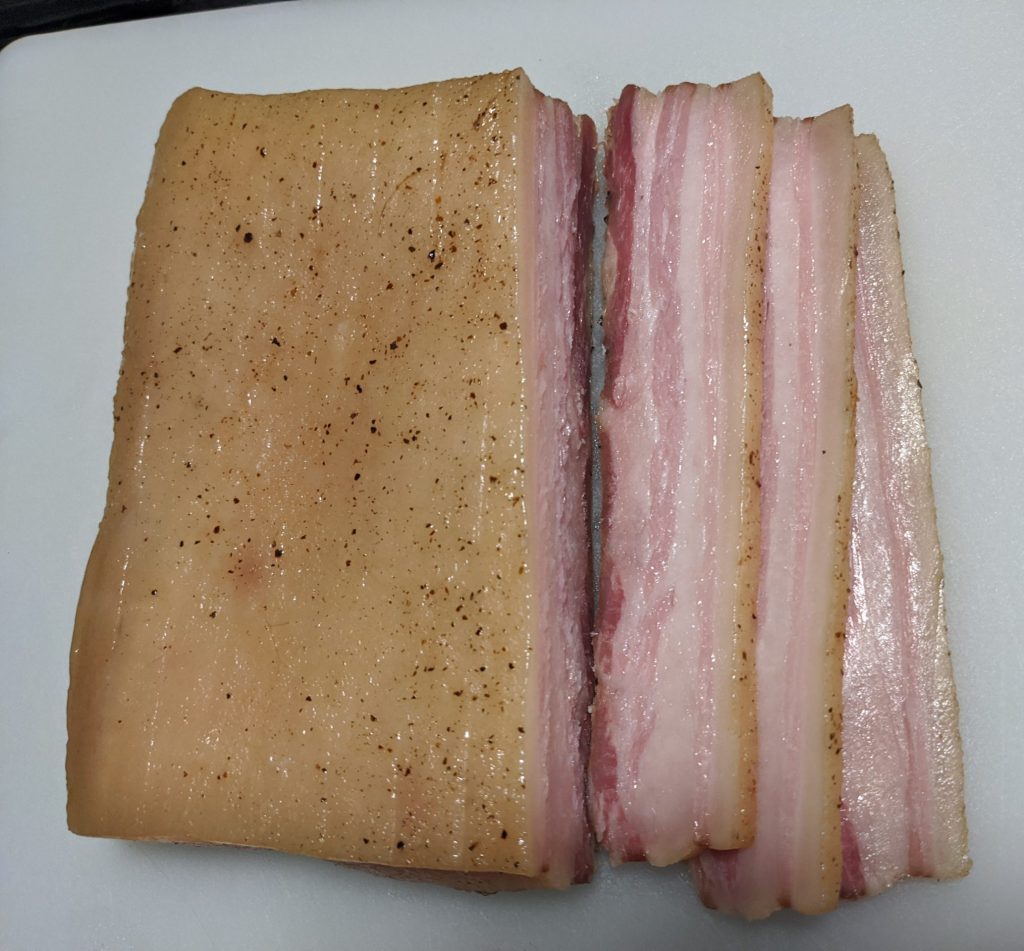
During the curing and smoking process the hunk of meat shrunk a little. I started out with 2 lbs. When it was finished smoking, it weighed 1 lb 12 oz. Once the meat was cold I sliced and cooked a little bit to make BLTs. I’m not even kidding when I say that this is some darn good bacon! In fact, it’s better than most of the bacon I’ve ever tried, and I’ve tried plenty! I have a feeling that we’ll go through this pretty quickly. I might have to start another batch pretty soon.
Here’s an update on the mead and hard cider I started last night in my Drink Like a Viking class. Note all the little bubbles being released as the yeast transforms the fermentable sugars into alcohol.
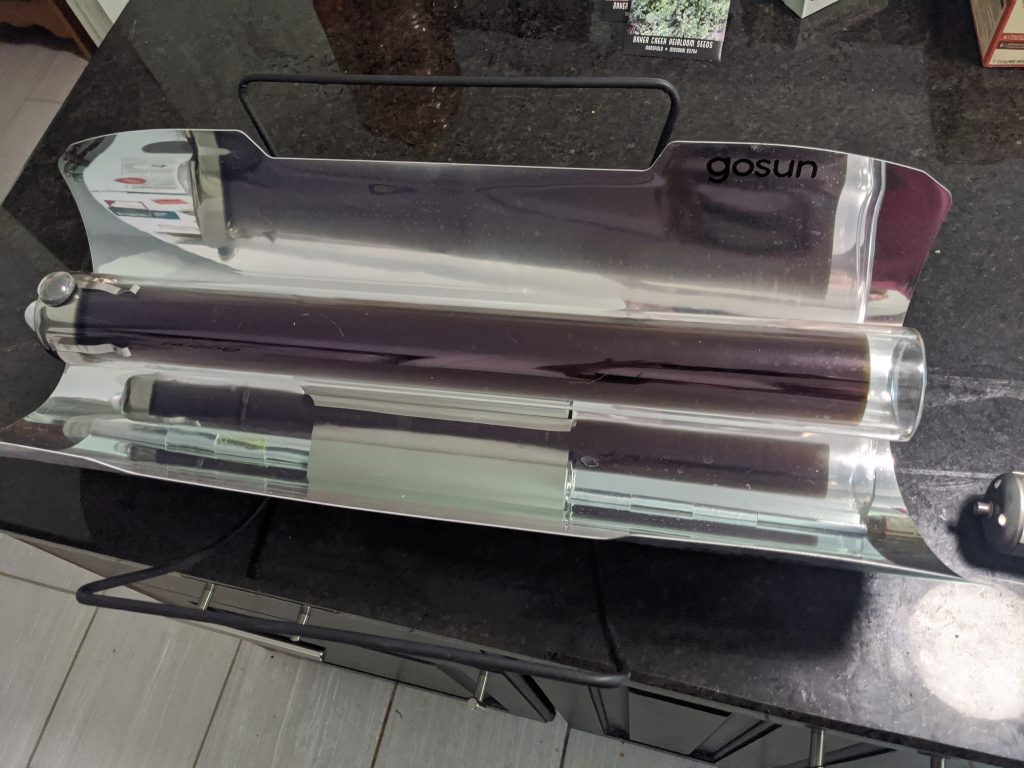
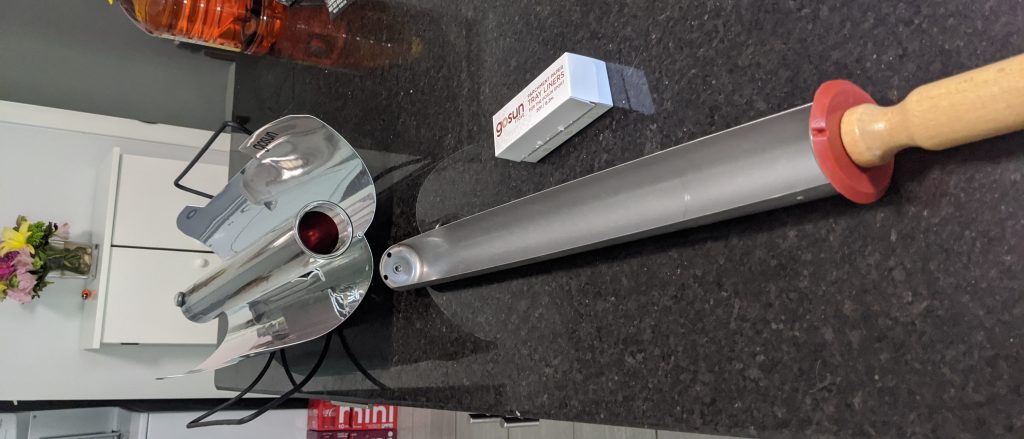
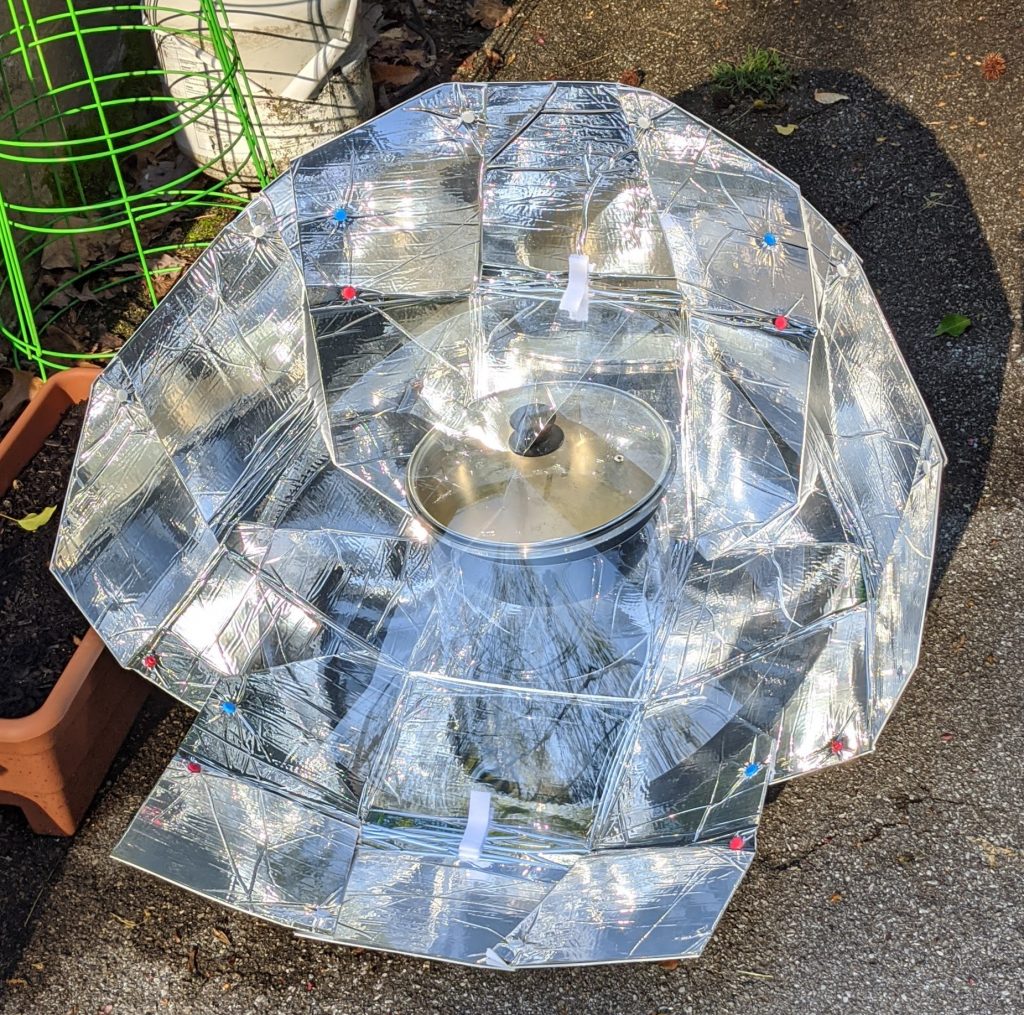
GoSun is the top of the line when it comes to solar cooking. When I first started looking into solar cookers around a decade ago, I seem to remember them making things that looked a lot more like the Haines. Then a few years back they started selling solar cookers with this black vacuum tube surrounded by metal reflectors. They now have a variety of sizes. I’ve got kind of the middle-range one, the GoSun Sport. The tray that slides into the vacuum tube is narrow, but holds enough food for me and my hubby. I’ve used the GoSun a couple of times before, so I know it’s a little difficult to clean if things get stuck on it. I recently bought some of GoSun’s tray liners. It’s basically just parchment paper that’s been cut very narrowly.
I really like the GoSun company. They are helping people in developing countries use the power of the sun to replace less sustainable, dirty fuel sources, such as wood or fossil fuels. They also now have solar powered coolers, solar lights, and a variety of solar panel options to charge small devices.
The GoSun is kind of like the superhero of solar cookers. Its strength is that it cooks really fast compared to the other solar cookers. Its weakness is that once the glass vacuum tube has warmed up in the sun you can’t put a cold tray in it, especially if it’s got liquid in it. I once watched an episode of America’s Next Top Chef where they used GoSuns and one shattered when one of the chefs put something wet in it while it was hot. The GoSun Sport comes with two trays, but I’ve never tried switching them out once the tube is hot. I read on an a forum that some folks let their second tray sit in the sun to warm up before switching the trays. I haven’t tried doing it yet, so I’m not recommending it at this point.
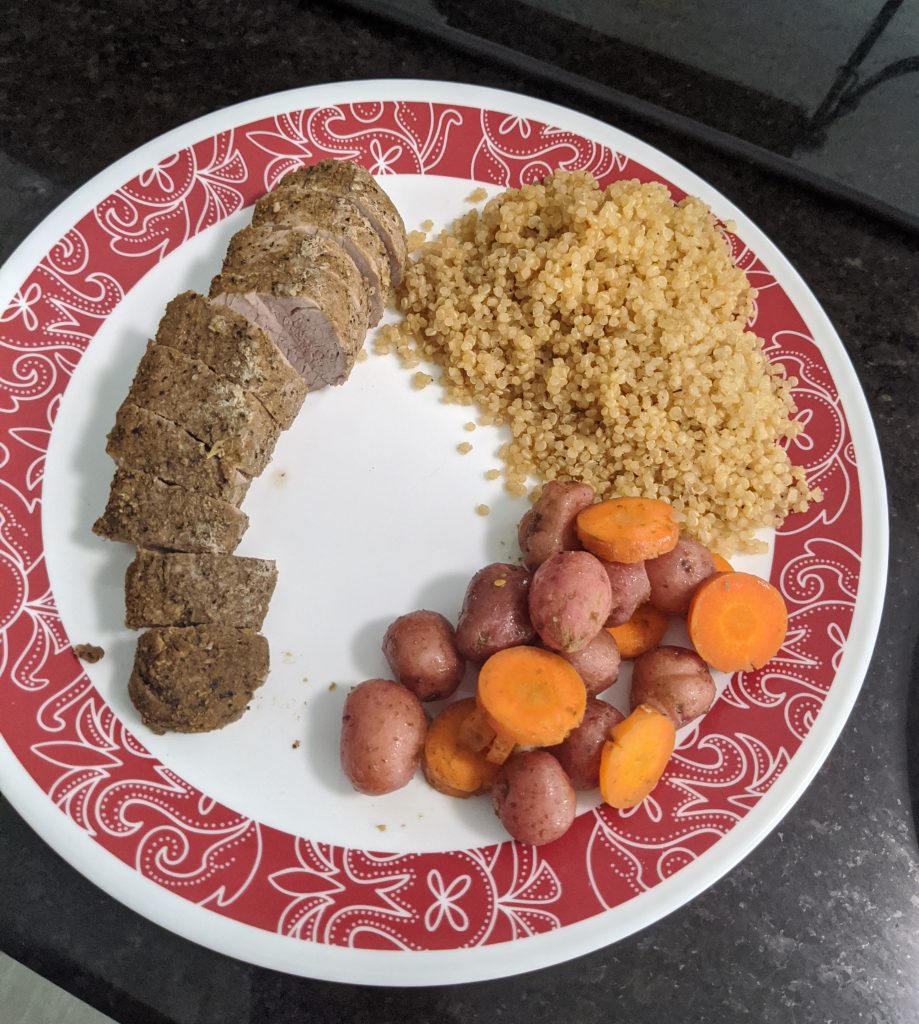
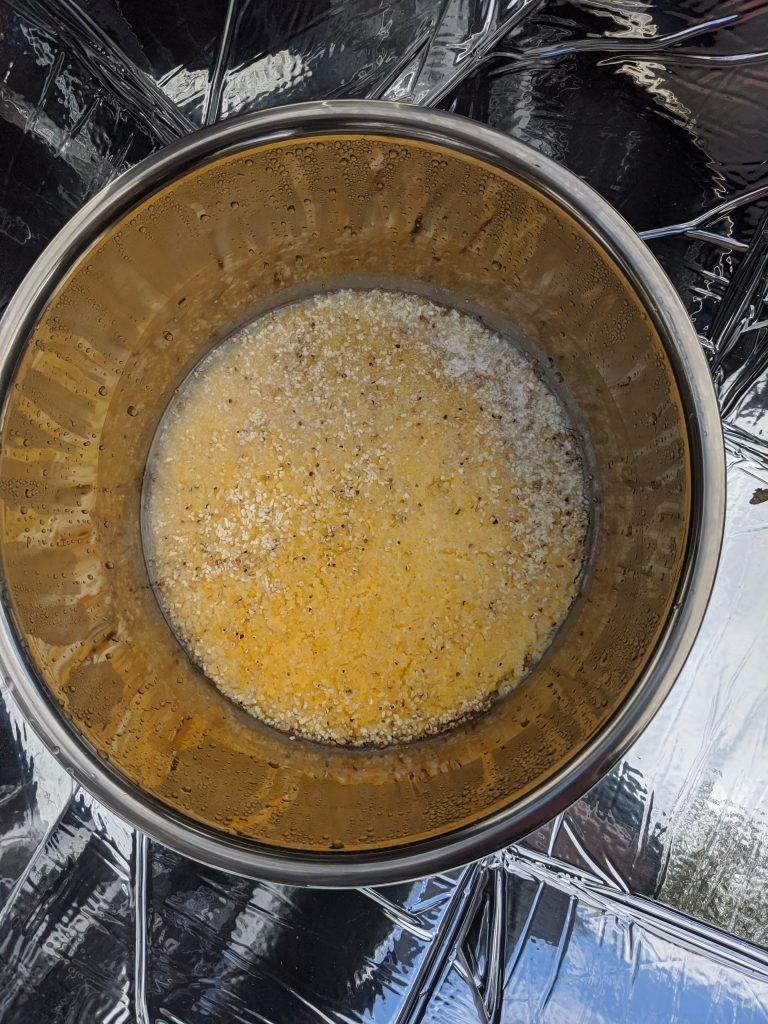
Anyhow, today I decided to make quinoa in the Haines and pork tenderloin in the GoSun. I got the pork tenderloin at a local butcher shop and chose it specifically for its long, narrow shape. Other cuts of meat would work too, but they may have to be cut to fit the tray. The tenderloin didn’t take up the whole tray, so I filled the rest of it with mini red potatoes, carrots and green onions. The quinoa and the pork tenderloin were seasoned with Moroccan Res El Hanout seasoning, while I seasoned the veggies with za’atar. I guess I was missing Middle Eastern flavors today.
Knowing that my hubby takes his lunch break at noon, I put the quinoa on the Haines cooker at 10:00 am. I had mixed 2 cups of veggie broth with one cup of quinoa, some salt and the Ras El Hanout. I wasn’t sure if it would be done in time, but if it wasn’t ready for lunch I figured we could have it for dinner.
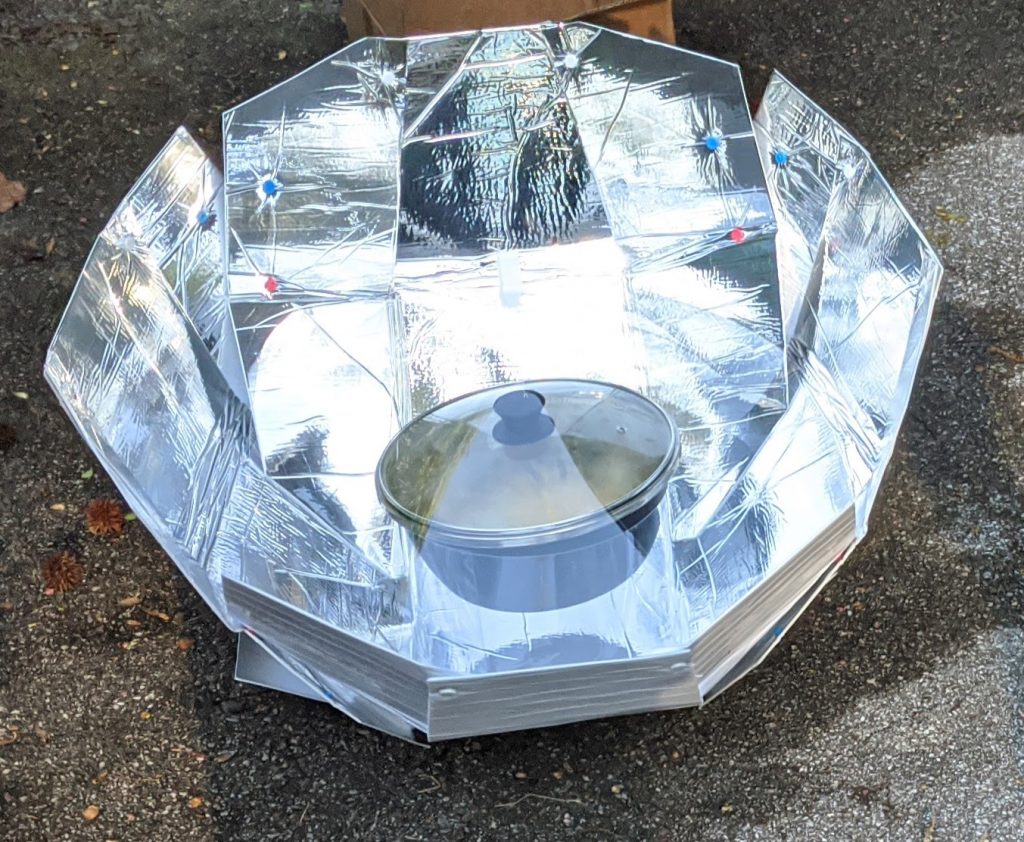
I set out the tenderloin & veggies at 11:00 am. The GoSun cooks faster than the Haines, so I knew it would have our lunch done in time. The GoSun has a little device on it that helps you find the best position so that it gets the most sun. Once I had the GoSun positioned correctly, I repositioned the Haines to mirror it. Soon after I realized that the quinoa was actually simmering. I didn’t see that with the polenta last week. Maybe I didn’t have it positioned correctly.
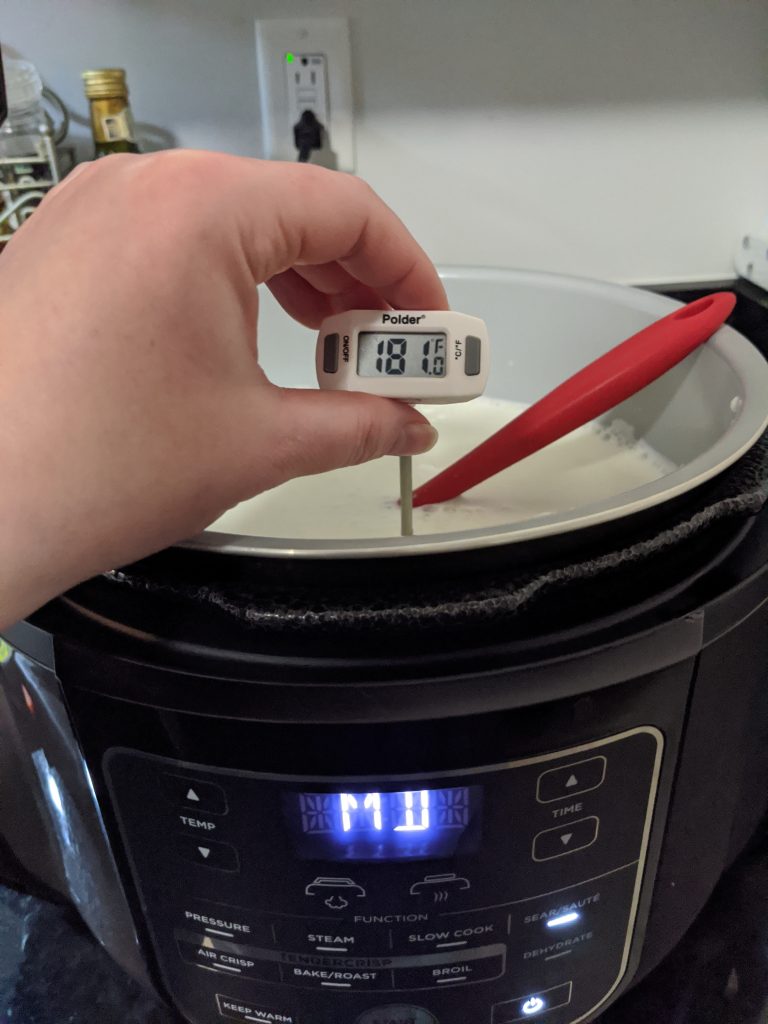
At noon I used a digital thermometer to check the pork and it was a perfect 165 degrees. The quinoa also appeared perfectly cooked. I brought the whole GoSun inside and the Dutch oven from the Haines. I dished up the quinoa and veggies while the pork rested a few minutes. Then I sliced up the pork and served us up a delicious meal without using a bit of electricity or gas and I didn’t have to heat up my house!
Our house is situated between two tall hills, so we have limited hours of direct sun. This means that I can really only prepare lunches with my solar cookers, at least until summer. Solar cookers work through cloud cover, but not in the shade. From what I’ve read, solar cookers even work in cold temperatures, they just take longer.
I am going to start planning out our lunches so that I’m using one or both of our solar cookers more often while we’re working from home. That should save us a little money and it’s better for the environment. We don’t know what the world is going to look like after Covid-19. I’m really hoping we come out of this with a more equitable world, one that is more sustainable. If that future is to come we have to start utilizing renewable energy sources, such as solar power. Solar cooking will have to be part of that future. That future starts with us and it has to start now.
I love the idea of solar cooking! Why waste natural resources and money when the sun is capable of cooking our food?
Ages ago when I was deployed to Saudi Arabia as a member of the Air Force, we were issued meals ready to eat (MREs) for a couple of weeks for our lunch. It was summertime in the Arabian Desert, so daytime temperatures were typically around 130 degrees. We would take the little pouches that contained the main dish, place them on rocks in the sunshine for 10 minutes, and they would get hot enough for steam to come from the pouch when they were opened. That experience really made me want to use solar power to cook food ever since.
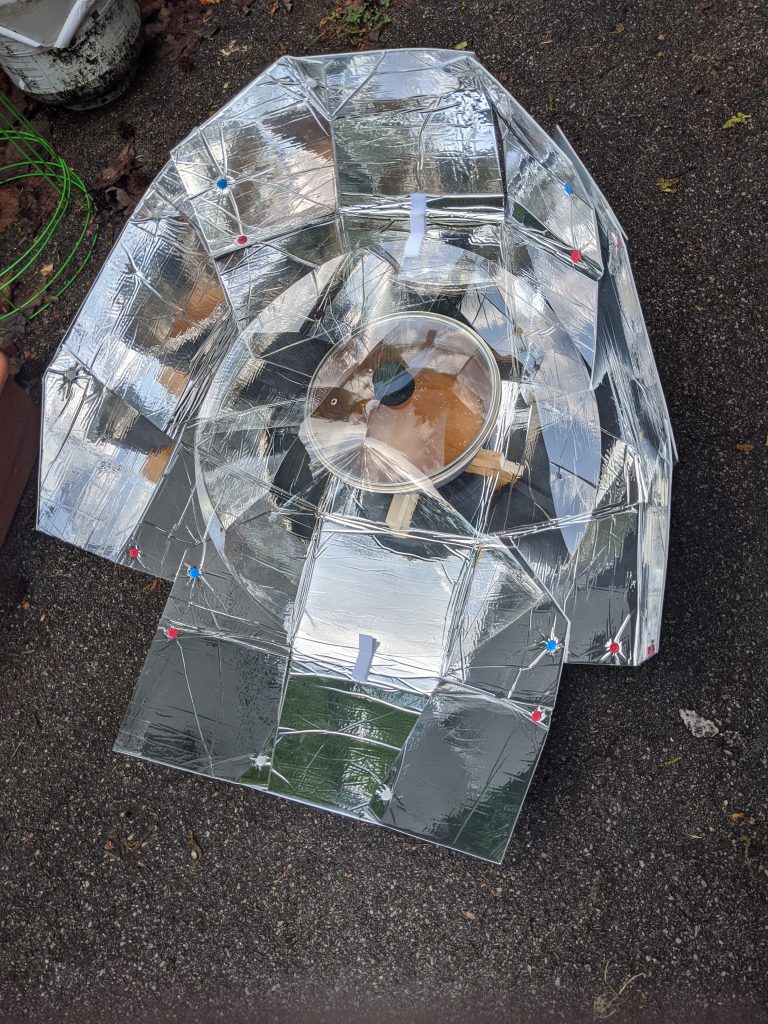
Last year I purchased two kinds of solar cookers, but I’ve been so busy with school that I hadn’t really gotten a chance to experiment with them. This week I decided to give the Haines 2.0 Solar Cooker and Dutch Oven Set a try. The assembly directions were fairly straight forward, so I had it together in about 10 minutes. I decided to make something simple the first time out, so I chose polenta.
I had read that the secret to most solar cooking was to get the food on early and let it cook throughout the day. It’s difficult to burn food in this type of cooker. Since the pot isn’t in contact with a burner you don’t even have to stir it! The biggest thing I had to do was move the cooker to catch the best sun every couple of hours.
As the sun moved overhead the cooker’s configuration had to be changed to make the most of the sun’s rays.
It probably took about six hours, but at the end of the day I had a good sized batch of delicious polenta!
Next week I think I’ll use this and my GoSun Sport to cook an entire meal.
I meant to write this last week, but I never really got around to it. I’ve been working on school and work projects from my couch while my coworkers (my kitty cats) have relentlessly demanded my attention. Nonetheless, I’m writing this now before I forget.
My hubby and I have been working from home and practicing social distancing from other folks for about 15 days. I have only been to the store a couple of times since my university has suspended in-person classes.
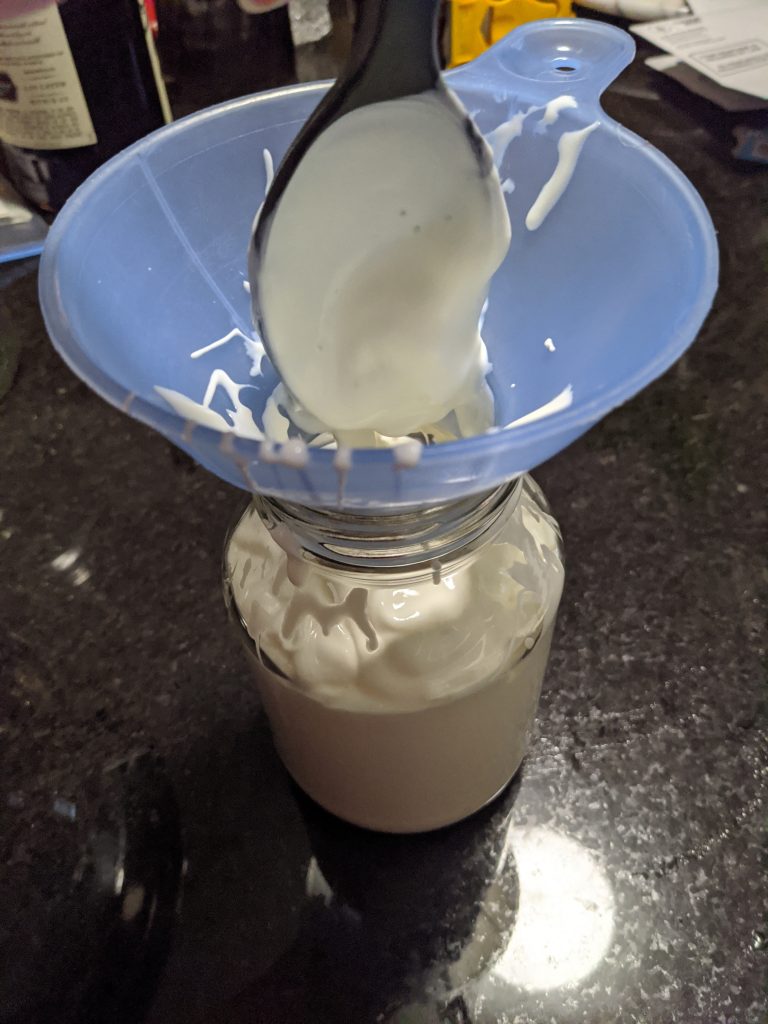
In an effort to not let milk go to waste and to also avoid having to go out more than necessary, I decided to make yogurt in my Ninja Foodi. I had done yogurt in my Instant Pot using jars before. In the Ninja, I just made it in the pot.
After letting the milk reach the proper temperature to kill any unwanted bacteria, I let it cool down to about 110 degrees before adding my yogurt culture. Then I let it sit overnight with the pot turned off. The Ninja kept the temperature just right to let the milk culture.
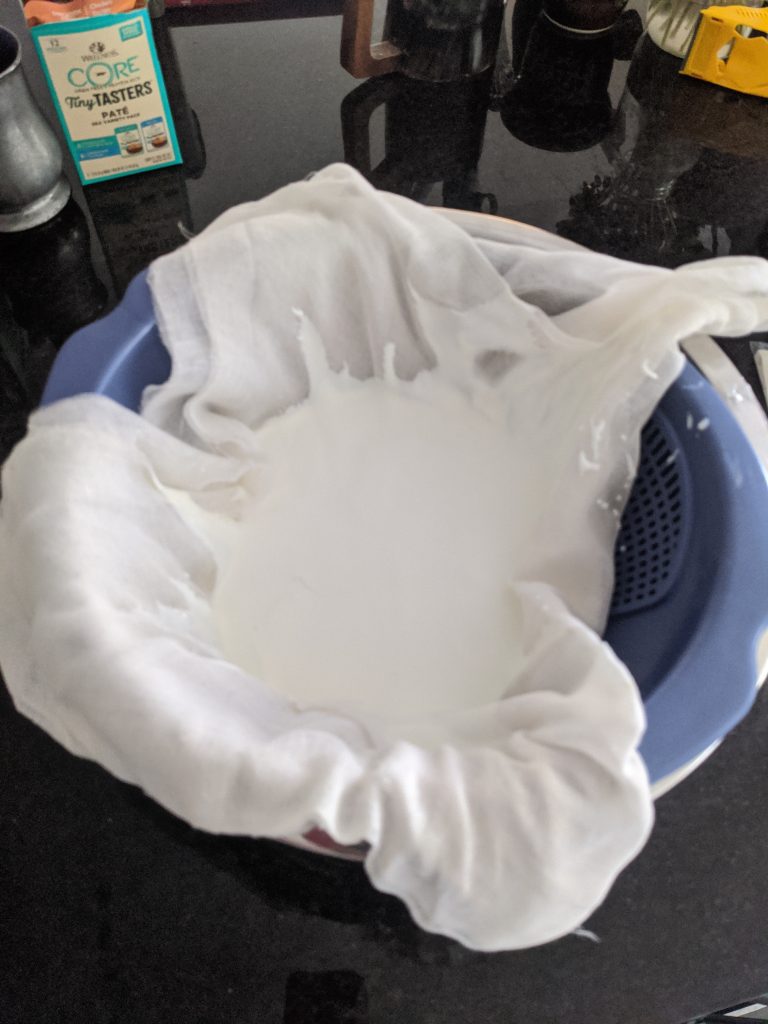
I really prefer a thick yogurt, like Greek yogurt. The thickness is achieved by draining the whey. So next I put the fresh yogurt in a cheesecloth lined colander to let some of the whey drain off. I had so much yogurt that I had to do it in two batches. Each batch took several hours.
Finally, I put the finished yogurt in jars and stuck them in the fridge. Now I’ve got two quarts of delicious homemade yogurt! Easy peasy!
In the days and weeks to come, please take care of yourself physically, mentally, and spiritually. Let your loved ones know how much they mean to you. Stay home, wash your hands, and maybe try making some yogurt.
For this and other dairy culturing recipes, you can get a copy of my book, The Fermdamentals Guide to Fermentation, or you can take an upcoming online class with me through The Chattery on April 11th. The listing for it will be online soon, although my Basic Veggie Fermentation class is currently listed.
I’m really sorry it has been so long since I’ve written anything. (Going back to school kind of took precedence.) Well, I’ve written a ton of things actually, just not about fermentation. The only thing I’ve fermented the past couple of years has been mead and ciser, at least until this week.
I’ve had friends who were preppers or survivalists at various times. And I’m a military veteran. I strongly believe in “hoping for the best and planning for the worst.” Last year we had a water main break in my town that left us without tap water for several days. I began storing water in Aquabricks. To keep the water fresh, I also got some little drops that are supposed to work for five years.
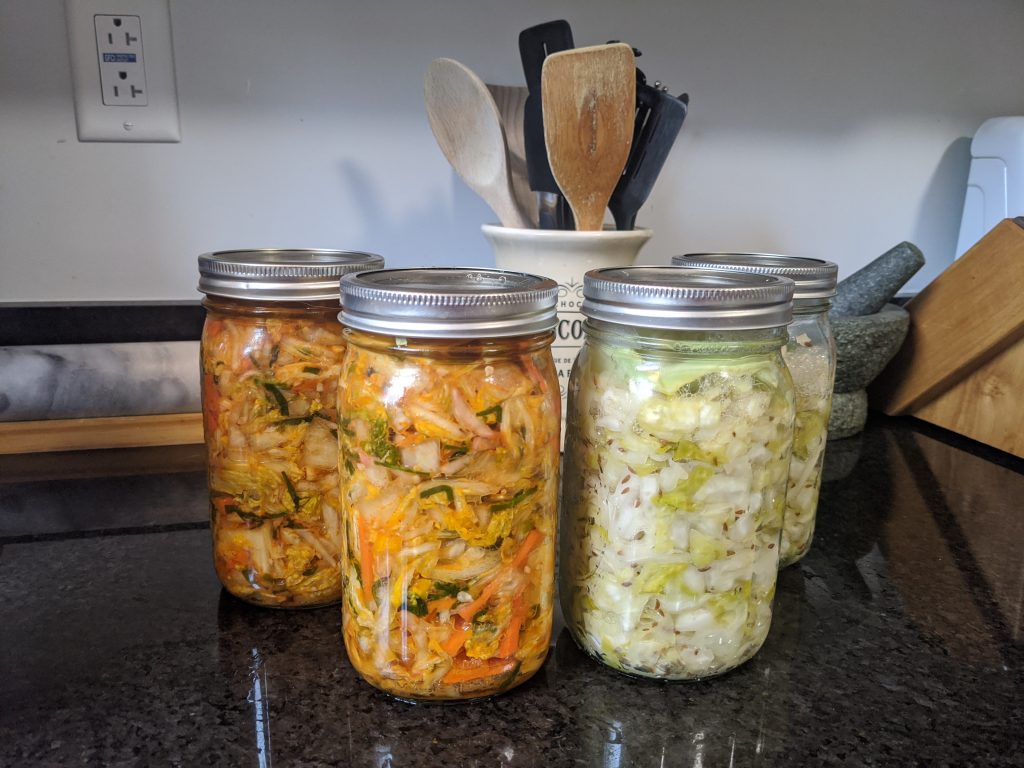
I’ve also been buying food that can be stored long term, like rice, beans, and dehydrated fruits & veggies. A couple of weeks ago, when the first cases of Covid-19 were announced on the west coast I went to CostCo and stocked up our pantry with stuff that’s easy to prepare, like soup and snacky stuff.
But then I started thinking that we really needed to boost our microbiomes in order to help us stay healthy. I got out my Fermdamentals Guide to Fermentation, made my shopping list, and headed back to the grocery store to get my ingredients for sauerkraut and kimchi. I spent a couple of hours chopping veggies and massaging the salt and spices into them before putting them in jars. I ended up with two jars of each ferment. I also went through another fermentation cookbook, The Kimchi Cookbook, and found a recipe for cucumber kimchi that I’m about to make too.
I think some of my friends and family may have raised an eyebrow or two when I told them that I had been doing some “doomsday prepping,” but I’m sure glad I did it now! Last night the chancellor of my university cancelled all non-essential travel and face-to-face classes for an indeterminate amount of time. I woke up this morning feeling under the weather. Hopefully it’s nothing serious. I’m reasonably healthy, so I don’t feel like I’m in any real danger. I did, however, decide to work from home today. I don’t want to infect anyone else with whatever it is I may have picked up.
So hurry and get your cabbage and get your veggies fermenting. If nothing else, you’ll have crisp, delicious veggies that will stay good for a long time. Above all else, be safe!
It’s been a little while since I posted anything. I’ve been busy making art and teaching classes. I’ve also been accepted into a PhD program! This new adventure is going to keep me really busy the next few years, so I decided to take the advice of several of my students over the years and publish a “cookbook” called The Fermdamentals Guide to Fermentation. We know that most ferments aren’t cooked, at least not to begin with, but I’m not really sure what else to call it.
The Fermdamentals Guide to Fermentation
If you’re interested in learning about fermentation and would like a collection of my favorite fermentation recipes, you can buy a copy here.
I don’t know about anyone else, but sometimes it’s hard for me to get motivated to do much fermentation during the winter. With the longer days, warmer weather, and land turning green again, I have been feeling the urge to get some things brewing.
First Stages of Violet Wine Fermentation
First of all, my yard is covered in lovely violets this time of year. I spent a couple of hours picking some (only about a third. I can’t bear the thought of depriving the bees and butterflies of food) and decided to make violet wine. I didn’t find any real recipes for this, so I’m experimenting. I hope it turns out because I won’t be able to try again for another year.
Next, I made two meads: a plain mead made with local sour wood honey and a vanilla metheglin (mead made with spices) made with local wildflower honey. They should be ready to bottle in another month or two.
Boiling Elderflower Must
Third, I went with my hubby to a conference he attended in Knoxville, where I visited a brew shop. There I picked up a couple of bags of dried elderflowers, as well as some other supplies. I tried a friend’s elderflower wine a few years back and it was one of the most amazing wines I’ve ever tasted! Flavor seemed to burst like little bubbles on my palate (and this wasn’t effervescent, mind you), kind of like tiny drops of sunshine on the tongue. He made his with an elderflower drink he picked up at Ikea. I’ve not been to an Ikea in ages, simply because there’s not one very close to me, so I decided to try to make it from scratch. It was going very well at first, but when I transferred the fermenting must to a carboy the fermentation completely stalled. I tried to rescue it by adding more yeast nutrient and yeast energizer along with mixing in more oxygen. When that didn’t work, I pitched a new package of yeast. Nada. Luckily I have more elderflowers, so I’m going to try again. I have no idea what went wrong.
Finally, I have been begging people to let me come to their yards (if they are not treated with herbicides and pesticides) to pick dandelions for dandelion wine. No one was taking me up on my offer of some minor lawn maintenance, but finally, a friend told me about a city park where there were tons of dandelions. She went with me and we picked about a gallon while racing the park employee on his lawnmower. Again, things went great until I put the wine in its fermentation vessel.
I don’t know what’s going on here, but it’s starting to annoy me. It’s one thing to have to start over with dried flowers I can easily buy, but picking a gallon of dandelions is backbreaking work. It takes a LOT of flower heads to make a gallon. I’ve never had issues with stalled fermentations before, however, my husband’s beer has been stalling ever since we moved into this new place. Perhaps there’s something in the air that is somehow contaminating our brews. We are pretty thorough in our sanitation practices, especially with the beer (it’s much more susceptible to infection than wine or mead), so I don’t know what’s going on. I guess I will start over with the elderflower wine and be super careful, taking note of every step along the way. Fingers crossed!
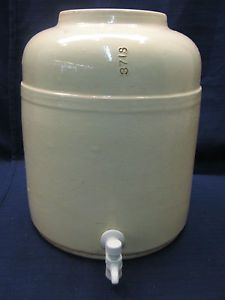
When I was in South Carolina, my hubby and I found an old water cooler at an antique store for around $25. It was intact, so I brought it home cleaned it up, replaced the old spigot, and used it for a continuous brewing system for kombucha for a long time. It held about five gallons, but we go through a lot of kombucha. The downside of it was that since it was made of pottery, I could only view things from the top. Eventually my kombucha was turning straight to vinegar almost as soon as the fresh tea was added.
When I pulled my SCOBY out it was about 7″ thick and 14″ across! No wonder I had vinegar! I thinned down the SCOBY (made some yummy SCOBY candy with the part I peeled off), cleaned the crock and let it get back to work. This set up continued until I noticed that it looked like the outside of the crock was sweating. Somehow cracks had formed inside and kombucha was literally seeping through the crock. I was really sad, but I pulled out the first small glass urn I had gotten when I started doing continuous brewing. I turned the leaky crock into a compost tea brewing system to nourish my garden and yard.
Worm Casting Tea Brewing Away
Since moving to Chattanooga, I’ve struggled to keep my kombucha at the right level of sweet to sour. I just didn’t like the 1 gallon urn I had it in. I really dislike using Mason jars for kombucha, because we drink so much of it and fooling around with the jars is a pain. As a result, we stopped drinking one of our favorite, healthy, fermented beverages for a while. Then my hubby got in one of his beer brewing catalogs and we found our solution, the Big Mouth Bubbler.
The Big Mouth Bubbler was made initially for beer brewing. When beer is first fermenting it can produce a thick layer of foam on top called a krausen. After a day or two the krausen usually subsides, but it leaves a stubborn film inside the carboy. Beer carboys tend to have a very narrow mouth, so the only way to clean them is with chemicals, a big bottle brush, and patience. The Big Mouth Bubbler was created to help beer brewers clean their equipment by giving the carboy a big mouth, thus the name. At first they only came in plastic (I despise plastic and certainly would never choose to ferment in it), then they upgraded to glass. The latest incarnation came with a spigot so that brewers can bottle directly from the carboy and not have to worry about tubing, siphons, and other stuff. This is what I had been waiting for!!!
Kombucha Brewing in Big Mouth Bubbler
I recently got my Big Mouth Bubbler and have successfully begun brewing kombucha again! I haven’t managed to get it up to 5 gallons (we keep drinking it) , but I think I might go ahead and try to finish filling it this week. I love that I can see into it to monitor my SCOBY and the level of kombucha I have. My next project is to make a carboy cover. I have made a bunch in the past out of old t-shirts, but I need a new one to accommodate my Big Mouth!
Obviously not writing! A few months ago as my hubby and I were visiting the Chattanooga WorkSpace for Open Studio Night, it struck me that I really wanted to have a studio there. I had already been teaching my fermentation classes there for a few months, so I applied and got in! I’m actually sharing a studio with another gal. She’s rarely there (she’s a photographer), so I have the space to myself to do my textile art.
Natural Dyeing and Plant Pounding Items I’ve Made
Years ago I had done a good bit of fabric dyeing and have gotten back into it with a vengeance. One of the things I want to try soon is dyeing with prickly pear. The Navajo have used prickly pear for centuries to dye their fabric. Now you may wonder why I’m going on about this on my fermentation blog, but prickly pear dye is fermented! I’ve never eaten prickly pear, but I’ll certainly be looking for them in the grocery store now. When I do this experiment I’ll certainly take photos and post them.
I also completed the Hamilton County Master Gardener course. I’ve been doing organic gardening for four years now, but I learned so much! I’ve completed over half of my volunteer hours required to become a certified Master Gardener. Still over 20 to go!
Despite everything else going on, I’ve continued to teach my fermentation classes and have even added a couple to my repertoire. In March I taught a class called “Kombucha & More.” The “More” was jun and water kefir. It went really well and I’m looking forward to doing that one again in the fall. In June I will be teaching a blackberry wine class. I’ll actually be teaching it in July, as well. My old friend, Kim Hines from Augusta Locally Grown, reached out to me and asked me to come back to Augusta and teach. Then I’ll be racing back the Chattanooga to teach a Bratwurst & Sauerkraut class at the Sweet & Savory Classroom. It will be my first time partnering with this organization, so keep your fingers crossed for me! Then I’ll be teaching a class on Hard Root Beer and Hard Ginger Beer. Then in August I thing I’ll do Veggie Fermentation once again so folks will be ready for their harvest.
So see, I’ve been busy! I’ve neglected my blogging too long, though. I’ll be getting back in the swing of blogging again, so keep your eyes peeled for new posts. Also, if you are into textiles check out my other website. I’ll be teaching various textile classes in the weeks to come.